Are you looking for a creative and safe activity to share a unique moment with your children? Making a homemade dreamcatcher perfectly meets this need, combining manual hobby and personalized decoration. This article guides you step by step in creating a dream catcher, from choosing hypoallergenic materials to tips for integrating decorative elements like paper stars. Discover how to transform this Ojibwe tradition into a memorable family workshop, with modern alternatives adapted to little hands.
Materials and preparation for a family workshop
Discover the basic equipment and alternatives to make a dreamcatcher as a family.
Wooden or metal circle: favor eco-friendly bamboo hoops or recycled metal hangers
Resistant thread: opt for colored wool or macramé cotton to simplify weaving
Hypoallergenic feathers: choose synthetic models or decorative ribbons as an alternative
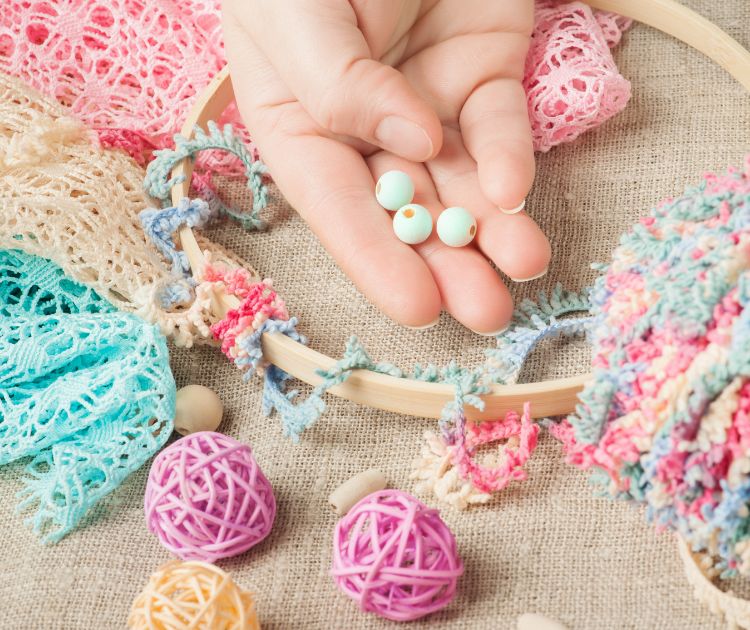
Safe beads: prefer large non-toxic wooden beads for little hands
Complete creative kit: a turnkey solution with numbered pattern and pre-cut pieces
The willow wood hoop remains the traditional reference, but modern alternatives offer more safety. Opt for synthetic feathers to avoid allergies.
Organize a clear space with rounded cutlery and solvent-free glue. Keep sharp scissors away and prepare cardboard templates to guide children. An oilcloth protects the table from stains.
Criterion
Features
Selection tips
Recommended age
3 to 12 years with variations depending on complexity
Favor lightweight wooden hoops for children under 6
Materials included
Circle (wood/metal), resistant thread, feathers, beads, ribbons
Check for the presence of 8 to 14 decorative elements minimum
Avoid kits with small detachable parts for children under 3
Average price
€10 to €25 depending on quality
Budget €19.75 for French kits with video tutorial included
Customization
Colored ribbons, paper stars, themed patterns
Choose kits with 3 minimum color options
To integrate your creation into a child's headboard or the bed of a 3-year-old, opt for a hoop of 20 cm maximum. Attach it with double-sided adhesive hooks, out of reach of little hands.
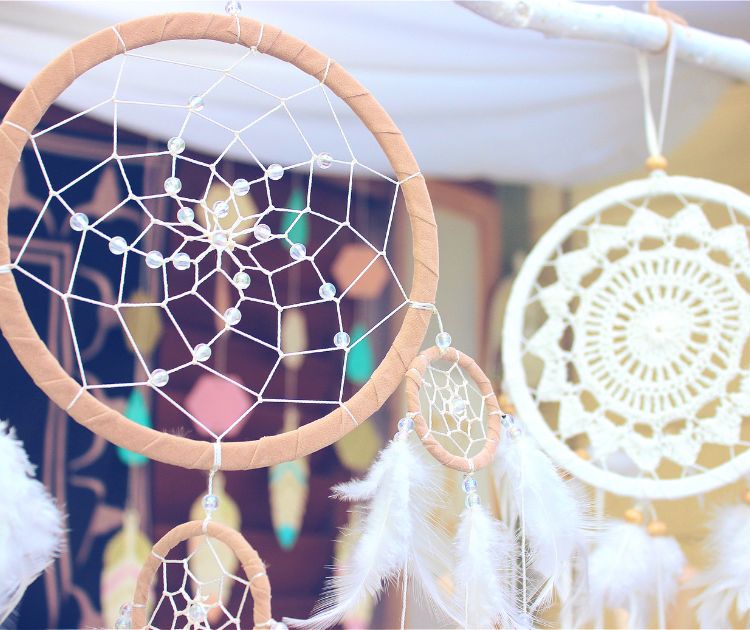
The 7 steps to make your dreamcatcher
1️⃣ Create the hoop
Use a metal hanger and bend it by hand to give it a round shape. No need for sharp tools, it's safer for children.
?Tip: for a more natural and eco-friendly version, you can also use flexible branches tied with string.
2️⃣ Cover the hoop (optional)
For a softer and prettier result, wrap a ribbon around the hoop by securing it with a little glue.
3️⃣ Weave the web
Take a strong thread (cotton, fine wool…) and teach children to make simple flat knots all around the hoop to create the web.
? Little tip: if a weaving mistake happens, don't panic! Add a bead at that spot or transform it into a support for a feather.
4️⃣ Add beads and decorations
Thread wooden beads (3 cm minimum for little hands) onto the thread. You can also cut out stars from paper for a magical touch.
? Idea: combine satin ribbons and small pompoms to make the dreamcatcher even more colorful. For toddlers, use stickers for risk-free decoration.
5️⃣ Attach ribbons and feathers
Attach several 30 to 50 cm ribbons to the bottom of the hoop. Attach feathers to the ribbon ends with a slip knot and a drop of non-toxic glue.
6️⃣ Let dry
Before hanging your dreamcatcher, let the whole thing dry thoroughly so that everything holds perfectly.
7️⃣ Hang the dreamcatcher
Hang it above the bed or in a corner of the child's room to invite beautiful dreams.
Variations and cultural significance of the dreamcatcher
Originating from Ojibwe tradition, the dreamcatcher finds its roots in the teachings of Spider Woman. Pass on this legend to children by evoking the protective nets woven above cradles. The hoop symbolizes the solar cycle, with beads representing captured dreams.
Contemporary versions incorporate low-voltage LEDs fixed between the meshes. For a cloud effect, tie cotton fibers with density variations. Some models combine macramé and luminous elements for a soothing night light.
Hang the object at sunrise by explaining its role as a dream filter. This morning ritual materializes the disappearance of nightmares under the effect of light.
Adapt the patterns to the seasons: beaded snowflakes for winter, autumn leaves in felt. For a birthday, replace feathers with festive colored ribbons. Fairy tale characters can inspire original hoop shapes.
In summary, making a dreamcatcher combines accessible materials, creative personalization and cultural transmission. All you need to do is gather the necessary supplies to start an enriching family craft project.
This way, you will transform each night into a soothing moment, where only the most beautiful dreams will transport your children.


 What Age for Bunk Bed: Standards and Safety
 When to put baby in their room: age and transition
 Best Choice for Baby: Bed Attached to Parents or Next to Them?
 The convertible bed: furniture that grows with your child
 The bunk bed with storage and desk: discover its advantages!